Taking timing to the Edge with PTP – Part 2
Learn more about how to configure StarlingX to use it with Precision Time Protocol (PTP).
As we described in the first blog post of this series, PTP is a very important part of our increasingly automated and autonomous future. In this post we will share more details about the background technology and show how StarlingX makes it easy to configure and leverage these important capabilities.
To enable PTP, the StarlingX community chose to integrate the linuxptp package. For more information about the package, you can check the high-level overview documentation that was created by the Fedora community. PTP is easy to consume and configure in the StarlingX platform both via CLI and the GUI to use with both VM’s and containers running in your edge clouds. You can find more information about this feature in the StarlingX documentation.
Some terminology to remember:
- PTP grandmaster: is the master clock for the system that is connected to the highly accurate timing source. In today’s mobile networks this is typically a GNSS source.
- Boundary clock: is the local time synch for the cluster and can provide time synchronization to nodes within the cluster. With the right NIC’s and switches in the local ecosystem, the time can be synchronized on each node to within hundreds of nanoseconds.
For the configuration steps, let’s start by using the Horizon interface to configure PTP.
As a reminder, the Precision Time Protocol (PTP) is a protocol used to synchronize clocks in a network. You can use the web administration interface to configure these services on the host.
First you need to connect your cloud on the network that has the PTP master, broadcasting PTP time messages.
Please note that NTP and PTP are configured per host. You need to lock/unlock the host when updating clock_synchronization for that host.
You need to perform the following steps:
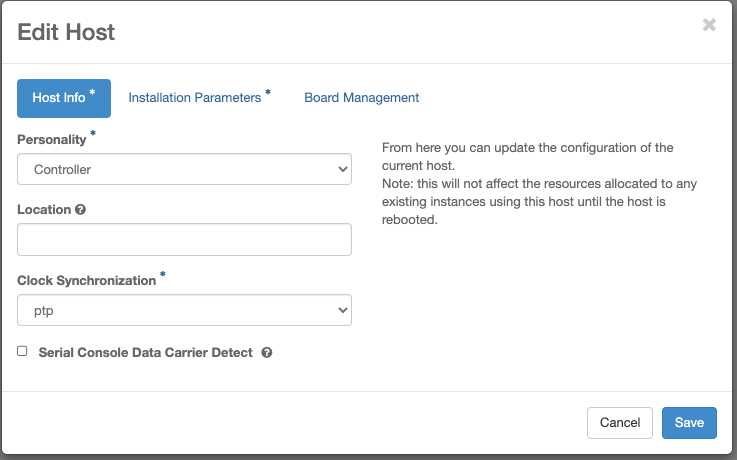
- In Horizon, open the Host Inventory page, available from Admin > Platform > Host Inventory. Select the Hosts tab, click on 'Edit Host' then change the Clock Synchronization to ‘ptp’ and click 'Save'.

- Then open the System Configuration page. The System Configuration page is available from Admin > Platform > System Configuration in the left-hand pane.
- Select the PTP tab to make the PTP page to appear.
-
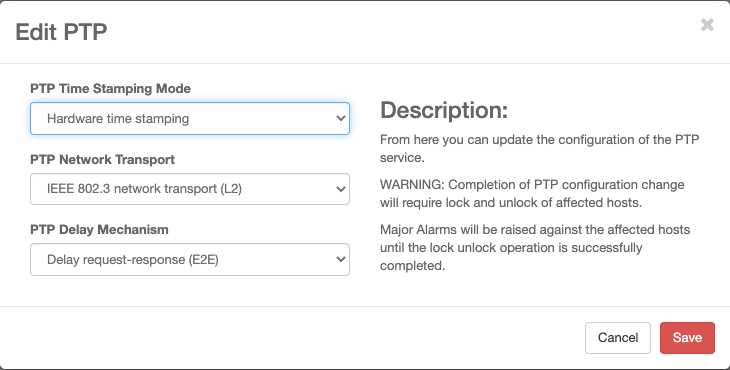
Click 'Edit PTP'. Update the configuration of the PTP service.

- PTP Time Stamping Mode: Hardware time stamping is the default option, this also achieves the best time synchronization.
- PTP Network Transport: Switch between IEEE 802.3 network transport (L2) or UDP IPv4/v6 network transport (UDP) for PTP messaging.
Please note that the default option is L2.
If you use UDP for PTP transport, each PTP interface must have an IP address assigned. This is enforced during host unlock, and when switching PTP transport to UDP.
-
PTP Delay Mechanism: Set one of the following two options:
- E2E: default delay request-response
- P2P: peer delay
- Click 'Save'. This will raise '250.001 Configuration out-of-date' alarms against the controllers, workers, and storages nodes. You can view the alarms on the Fault Management page.

-
Lock and unlock the controllers, workers, and storage nodes to apply the configuration and clear the 'Configuration out-of-date' alarms. Open the Host Inventory page, that is available from Admin > Platform > Host Inventory in the left- hand pane, and then select the Hosts tab. Hosts requiring attention are shown with the status 'Config out-of-date'.
To lock or unlock a host, click the Action Menu down arrow for the host and then use the menu selections:
- Lock the standby controller. Wait for the lock operation to be completed.
- Unlock the standby controller. Wait for the host to become available. Its configuration is updated, and its error message is cleared.
- Perform a swact on the active controller. Click Action Menu (down arrow) > Swact Host > for the active controller. Web administration access is interrupted, and the Cloud Platform login screen appears. Wait briefly for the Web service to stabilize, and then log in again.
- Lock the original controller (now in standby mode). Wait for the lock operation to be completed.
- Unlock the original controller. Wait for it to become available. Its configuration is updated, and its error message is cleared.
- Ensure that the 'Configuration out-of-date' alarms are cleared for both controllers.
As you can see in a few easy steps, PTP is now set up and being used to synchronize time in the system. You can confirm this by performing the following tests.
Verify the PTP setup and PTP role of the card:
- system ptp-show
- system host-if-show controller-0
Make sure the 'not locked to remote PTP Grand Master' alarm is not present. To verify, go to Admin > Fault Management > Active Alarms
Use the following PMC command to see the port’s state:
- sudo pmc -u -b 0 'GET PORTDATASET'

PTP is becoming a key functionality for critical infrastructure on the edge as digital transformation is impacting more and more industries. The last part of the series to learn how applications running on top of StarlingX can utilize this feature.